Sunday, December 18, 2011

Beginning the Verb Book Illustrations

2nd graders are also creating a book in the style of Eric Carle's illustrations.  However, instead of the alphabet, two of the 2nd grade classes were assigned verbs to illustrate, and another is illustrating places they have been or places they want to go.


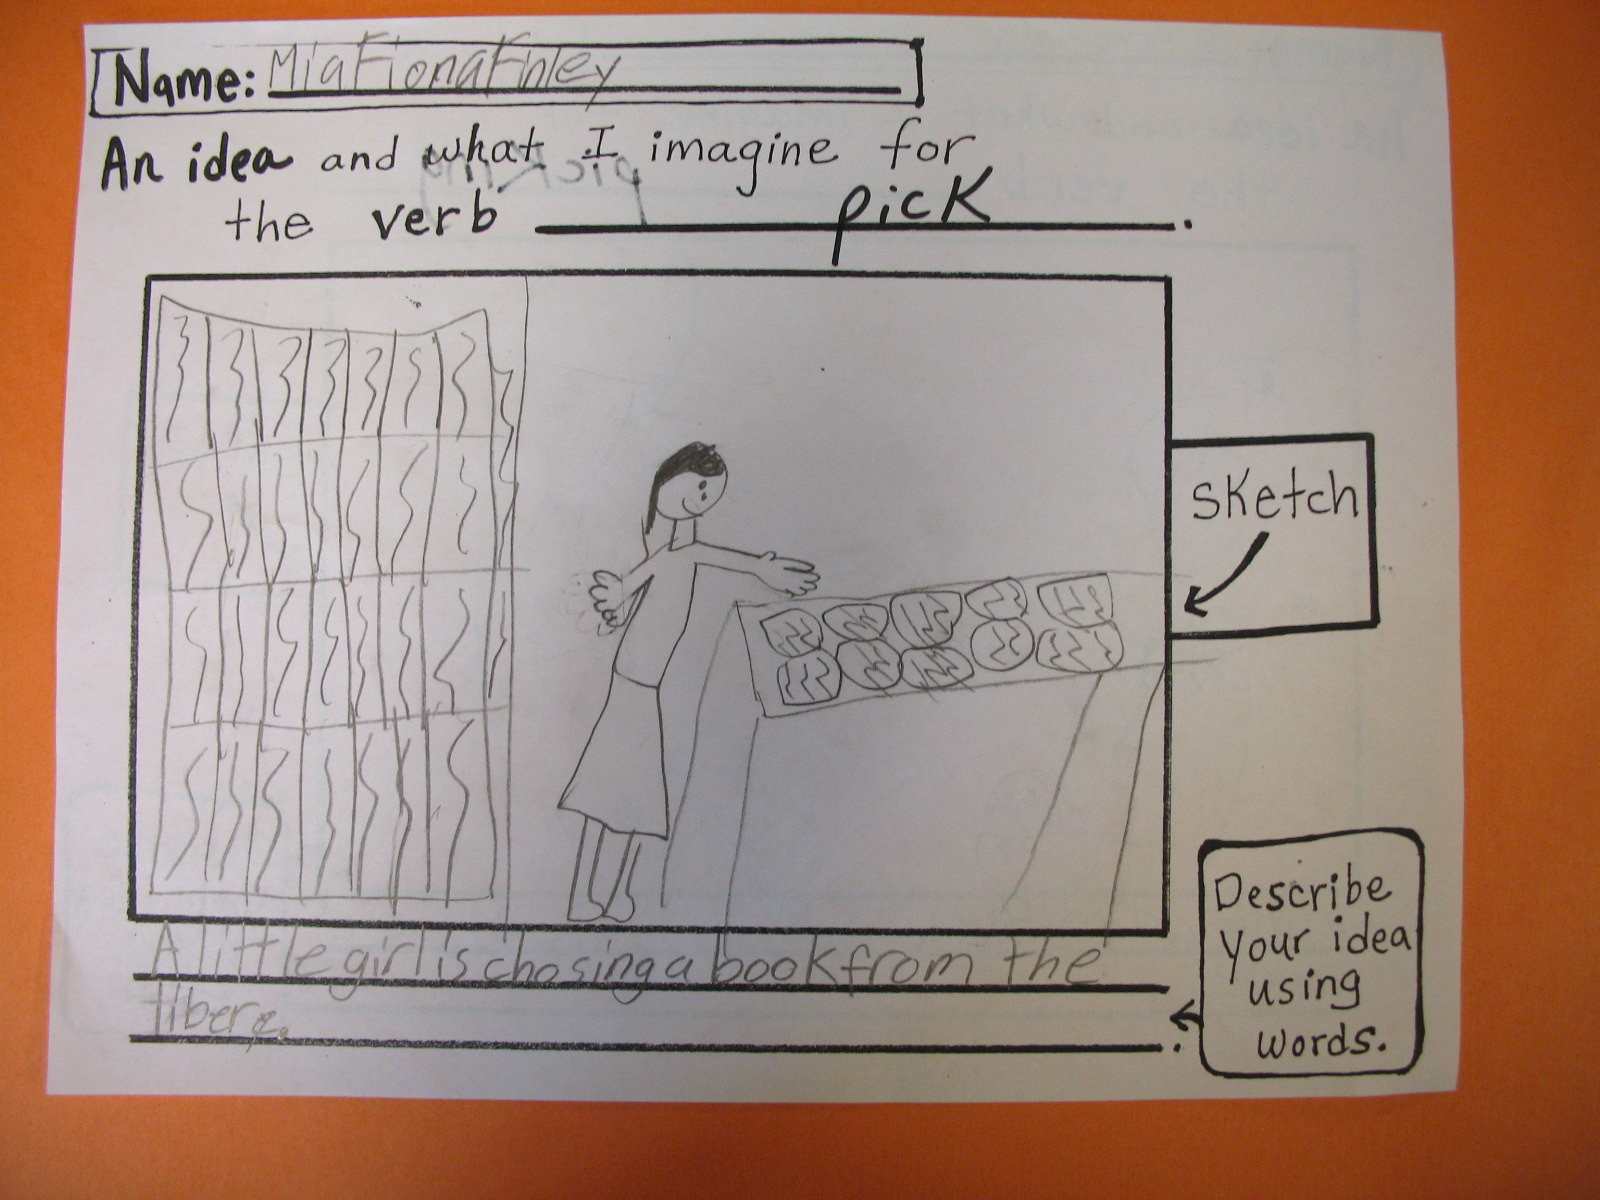
They are engaging in the same processes as the 1st graders, only at a more advanced level and with higher expectations. Each student created two different idea sketches about the same verb, as part of their envisioning process.  The students then chose one of the two ideas to proceed with.

Creating Practice Shadow Puppets

Students in grades 3 and 4 learned about the mechanics of shadow puppets by creating a practice puppet using a template. 


They chose between a bird and a snake, and learned through the process that they needed to draw all the moving parts separately, and then fasten them together.  It took us two 40 minute periods to make these in class. We had just a few minutes to practice with them in front of a shadow screen made out of a bed sheet. Those last few minutes of practice time were very fulfilling.


We made the puppets out of cereal boxes to save on resources and so that students would understand that they can make  puppet at home.

Beginning Our Alphabet Book Illustrations

We are currently studying different forms of Narrative Art across every grade level at Coonley.  
A few weeks ago (it has been a while since I have posted!), Kindergarteners and 1st graders began a project where each of them is illustrating a page in an alphabet book in the style of the illustrator Eric Carle. 


To begin the process, we looked at an illustration together that was projected on the wall.  The students shared their ideas about what alphabet letter was being illustrated by the image. Some suggestions were "P is for paper", "W is for women", "F is for letters flying all around".

This is the image we looked at together that was made by Brian Collier. 


Next, students were each assigned an alphabet letter, and they drew a picture for something that started with that letter.   There are so many fantastic drawings that came out of this envisioning session.

N is for Nightingales in a Nest

On the right you can see where Amaan and I brainstormed some "J" words together. 


 Next, students were given a large sheet of paper, and we talked about how they needed to draw their original sketch larger on the paper, so that the shapes in the drawing would be large enough for us to try and cut.  There were several different processes that Ms. Chisholm tried, in order to help the children draw larger than they were used to.  It was definitely a difficult concept for such young children.  Overall however, students did an amazing job drawing their original idea on a larger scale. 


Thursday, November 10, 2011

Crazy Talk Portraits and Facial Proportions

Ms. Wiltse, the librarian at Coonley of course, approached me with a collaboration where 4th graders create a self portrait for a book review on Crazy Talk. 
 
Even though I like the portraits Ms. Wiltse showed me, and the more child-like approach to drawing a face, I also know that 4th grade is around the time that kids start craving the ability to draw more realistically. 
So I thought I would use the collaboration as an opportunity for me to teach the 4th grade students about the proportions of the human face.  I knew the faces would not look at whimsical in the end, but my hope is that the students will achieve a little bit of a likeness to themselves.


Before we even got started, I asked students to draw an oval, and add the eyes, nose and mouth where they thought they belonged on the face.  Most of the pre-assessments looked like the ones below.  I used these drawings as an introduction to common misconceptions and mistakes that occur when drawing the face. One example is the eyes being too high on the face since we forget that we have such a giant cranium for our huge brains!


Next, after taking and printing their photos, over the course of two days, students followed me step by step as we drew lines for the general proportions of the human head. 


 We then talked about where to place and how to draw the general shapes for the eyes, nose and mouth.  


 Although this was a brief encounter with realistic drawing, my hope is that students will continue to practice drawing faces, and that they may do a few things differently now that they have had this experience. 


4th grade students will be continuing these portraits with Ms. Wiltse in the library, making them look even more like them instead of a general person, and adding color using colored pencils. 
We will return to drawing realistically later in the year.

It is always validating when students practice things from the art room on their own, as exhibited in this notebook drawing by Kayla.  Way to go Kayla. 


In this project, students developed the craft of learning how to draw a realistic human face. They also focused on closely observing their own features with the intent to record them on the page.

Sunday, November 6, 2011

Paste Paper!

Students in grades K-2 recently learned about the word texture in art room as they looked at work by the collage artist and illustrator Eric Carle.  


As a beginning to a longer project where students are illustrating a book using collage, each student experimented with making and imitating textures in paint.  

First we discussed the word texture and how it means the way something feels, and then we talked about how artists often try and mimic or show the way something feels by how they use their materials.


Students first applied the paint to their paper with a large brush, and then dragged things through the paint like combs, forks, pencils, and sponges.  By doing so, they got some interesting results.   


The colored paste is made from 50% paper mache' glue and 50% acrylic paint.


 This is a similar process to how Eric Carle produces his own collage papers that he then cuts up for his famous illustrations.


It sure was a challenge and a rush to put our smocks on, make two different textures on two pieces of paper and then wash everyone's hands, but we pulled it off.   Students in grades K-2 will be using these paste papers within their collage illustrations that will be coming soon...

Sunday, October 30, 2011

Contour Line Drawing

In preparation for an autobiographical comic strip project, 5th-8th graders at Coonley spent two weeks learning about and practicing the technique of contour line drawing. 


First we discussed the difference between a contour line drawing and an outline.  
Contour line drawings include lines that are both inside and outside of the forms we see.
We also discussed what it means to draw from observation. 
Next I demonstrated how to create a successful blind contour line drawing from observation.  When you create a blind contour line drawing, you DO NOT look at your paper.  Instead, you use a continuous line that takes you from one object to the next. You move your hand very slowly and record every detail and edge that you see.  You need to look closely in order to create a drawing that actually looks like what you are observing.


Blind Contour Line Drawing
Each table of students set up their own still life objects, and they practiced blind contour line drawing.  It was so hard to not look down at what we are drawing, and students struggled to move slowly and observe carefully.  It was also hard to try not caring about what our drawing looked like, since blind contour is not about the finished product, but rather about the act of looking closely at what you are seeing.  We did several timed blind contours in a row which was good practice for everyone.


Next, I demonstrated creating a contour line drawing of the still life objects. Students could now look at their paper periodically while drawing, in order to make sure their objects were placed on the page in a way that made sense.  I reminded the students nearly every second to look up almost all the time in order to draw what they are seeing, and not what they think they see (which are symbols of objects in our mind).  The more slowly students drew, and the less the more they observed their objects, the more realistic their drawings came out. 

Contour Line Drawing By Jenny


Some of the students are still struggling to create a successful drawing from observation, but here are some examples of students who were able to slow down and record what they see.

Organic Shapes Remind Us of Things


Over the last two weeks, the second and third graders and I 
have been comparing and contrasting organic and geometric shapes.  


 To begin, we talked about how shapes are made using lines. We talked about how geometric shapes are symmetrical and usually made with straight lines, and we compared geometric shapes to organic, which are not symmetrical, and are generally made with crazy, lumpy, curvy, and zig-zag lines that when combined together, 
remind of things in nature. 


In order to make our own organic shapes that are "shapes that don't have names", we played a game using different types of lines.  Each shape was made spontaneously, by students using a certain number of a specific type of line, combined with specific amounts other types of lines. 


The results were certifiably organic. 


Right before we began examining the shapes we made, we looked at this book by Lisa Campbell Ersnt.  In her book, she begins with the alphabet and examines each letter shape in different directions.  Each way you turn a letter, you see something different.  The students were really excited by her revelations, and were able to see what she saw in each letter.  Some of the students immediately began looking at their own organic shapes from every direction, such as the student above. 


Next, I had all the students cut out the organic shapes they had made, and look at them from different directions to decide what they could become.  Students then glued down their shapes onto paper, basing their placement upon what the shapes would become.  

 I then asked the students to add to their shapes suing drawing materials, as well as the background behind them, in order visually show others what they saw in each shape.  


I love this person, whose skirt and hat are made from organic shapes!
One shape has become a dog, and the other a flag.


One thing I like about this project, is that I believe it helps students think about drawing objects in different ways, other than their already traditional ways of representing objects.  I want students to realize that there are other ways they can describe something like a flag or a car beyond what they automatically draw.  K-4 students (and adults too) generally use something called a schema when they draw. A schema is a system or catalog of representation that students use to communicate and fall back on.  The catalogs evolve as students get older, but they generally draw things in the same way all the time.  I think schemas are important, but believe students should also be pushed to draw in new and different ways, both realistically, symbolically and figuratively. 

"I see a bird and this is a milkshake".


A mushroom garden and a clever bat appear in this drawing.

The Silhouetted Objects Challenge

In preparation for making shadow puppets, which rely heavily on shape to communicate story and a sense of character, I had students in the 3rd and 4th grade think more about shape.  As a one-day challenge, I showed them a projected silhouette of a stapler and a scissor, which they were immediately able to identify "because of their shape" and because they are familiar with these objects.
We talked briefly about the word silhouette.  I really like silhouettes because, as stated by the artist Beatrice Coron, the language of silhouettes is efficient and gets down to the essential (qualities of something).

Art by Beatrice Coron who works in cut paper!
I then demonstrated the challenge I wanted the students to take on during class time.  
Each table group was given a baggie of words naming different objects such as bird, lamps, swing, etc.  
The challenge was for students to be able to cut out a shape or multiple shapes that communicated their chosen word so that it could be recognized without using any lines whatsoever. 

This is a horse and a suitcase by third graders in 207.

Once they found a shape(s) that communicated their word, they cut it out and glued it onto a cardboard "flash card". 
Each class now has a set of flash cards which we will discuss and play with during the next class. 

Fork and Lamp

Television, Shirt and Cherry

During this "challenge", students had to visualize the objects in their mind, as well as to think symbolically and consider what is essential to recognizing a particular object as a shape in order to successfully communicate their word.  

"Donut", "Butterfly" and "Swing"
Some words were challenging even for adults, and students struggled to figure out just how to do it without using any describing lines. 


For instance, your really do need a cut hole to communicate a donut!


Many of the students were extremely successful at communicating their word in silhouette.  I often got chills when I looked at their flash cards, thinking, wow they really got it! 

"Basketball" and "Lamp"


"Helicopter" and "Socks"

Monday, October 17, 2011

Learning About Lines

Students in kindergarten and 1st grade last week learned about how there are many many kinds of lines in our visual world.  We talked about the definition of a line being "a dot that goes for a walk".  We read a book called Lines That Wiggle, which proved that just about anything you can think of can be described using lines. 


Students practiced making a variety of lines before they drew their picture.


Next the kindergarteners and 1st graders practiced creating six different kinds of lines.


Then on the other side of their paper, they used lines to make an image of their choice. Some students even used rulers to make super super straight lines in order to form things like houses.


Each artwork was filled with lines, and lines formed all the shapes we could think of.  
 We also tried to fill our whole page with descriptive details and colors, so that our viewers can see what the kindergarteners intend for them to see.

In order to make their art work, the students chose from a variety of drawing materials, which they accessed on their own within the
"drawing studio". 


"It's my birthday party and I'm going in a limo to a place called Lego Land."- Jackson